When your child is overwhelmed, I recommend reducing demands and checking for pain, hunger, fatigue, or sensory overload before trying to teach a skill. For children with ADHD, autism, or both, the same behavior can reflect different needs. The goal is safety and recovery – not constant calm.
I focus on 8 ways to help, shaped around your child’s needs:
- Make routines visible with short schedules and clear next steps.
- Offer co-regulation through a steady voice, fewer words, and space when needed.
- Prepare a calm space with tools your child chooses and can use safely.
- Practice emotion words and body cues for 2–5 minutes when calm.
- Plan movement or sensory breaks based on what helps – not as rewards.
- Ease transitions with advance notice, choices, and time to respond.
- Teach simple requests for help or a break, using speech, pictures, gestures, or AAC.
- Review after recovery without blame or pressure to talk.
My starting point is simple: notice the pattern, change what you can, and practice one skill at a time. <u>Teach when calm; support during distress.</u> Share what helps with school and other caregivers. If episodes worsen, disrupt daily life, or threaten safety, seek professional support rather than waiting for a crisis.
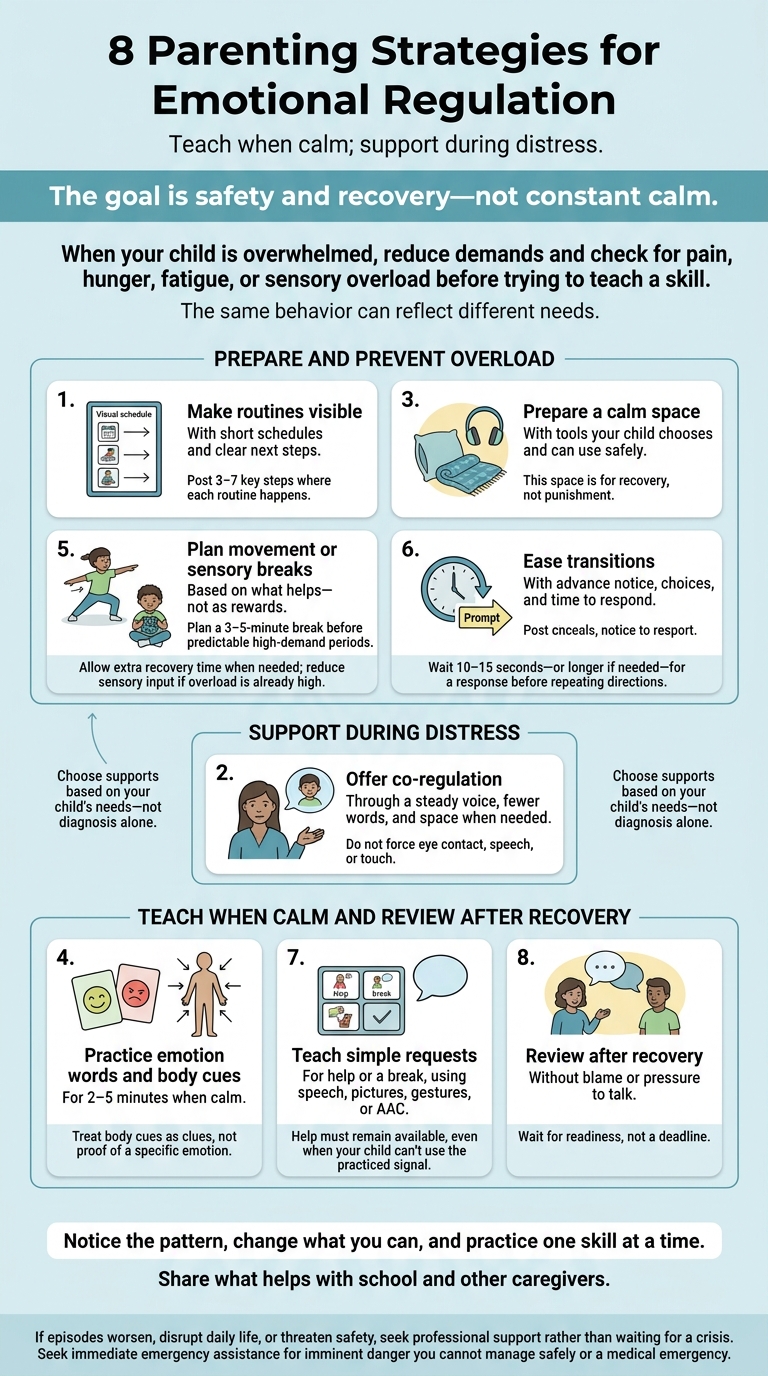
8 Parenting Strategies for Emotional Regulation
Understand What Is Driving the Distress
Start by identifying what is driving the distress. Escalation may look like grabbing, bolting, or difficulty stopping. Sensory overload happens when noise, light, touch, or other input becomes too much. A meltdown is an involuntary response to overwhelm. A shutdown may involve silence, withdrawal, less speech, or less movement. Quiet doesn’t always mean calm.
Look back at the minutes and hours before the distress. Consider demands, uncertainty, communication barriers, sensory discomfort, stress, missed meals, poor sleep, dehydration, bathroom needs, pain, and too little recovery time. New irritability or withdrawal may call for a medical check, especially if your child cannot reliably describe pain.
Keep a brief ABC log: Antecedent, Behavior, Consequence and recovery. Record the time, setting, trigger, observable signs, your response, how long the episode lasted, and what helped your child recover. Describe what you saw – not what you think it meant. The goal is to spot patterns you can change. Comparing notes across home and school can show which demands or conditions need adjusting and help you match support to the trigger.
Choose support that fits the barrier and your child’s developmental level. That might mean smaller steps, a visual prompt, more processing time, or access to gestures, pictures, typing, or AAC. Speaking fluently when calm doesn’t mean your child can access speech during overload.
Danger requires a safety plan. If bolting, self-injury, or dangerous aggression happens repeatedly, work with your child’s clinician on warning signs, supervision, exits, emergency contacts, and preferred calming tools. Safety planning is part of support, not separate from it. Seek immediate emergency assistance if there is imminent danger you cannot manage safely or a medical emergency.
sbb-itb-596b85d
1. Build Predictable Visual Routines
Challenge and timing
Morning, bedtime, and after-school routines put pressure on memory and can make transitions harder. A visible sequence helps your child know what to expect.[5][9][10] Use short, separate schedules instead of one large daily chart.[7][9] Start with the routines that, based on the patterns you’ve identified, most often lead to distress.
Parent actions
Post 3–7 key steps where each routine happens, and let your child check them off.[7][9] Pair the visual with one concrete direction, then give your child time to process it. Use first-then cues to show what comes next.[8]
A visible timer with 5-minute and 1-minute warnings may help, but skip it if it increases anxiety. When plans change, replace the affected schedule item before the transition so your child can see the change ahead of time.[6][10]
Build low-demand recovery into after-school time before homework or chores. Allow a snack, quiet time, or movement, with reduced verbal demands if needed. At bedtime, show the sequence through hygiene, a calming activity, and bedtime.
Gradually reduce reminders as your child learns the routine.[8][10]
ADHD and autism considerations
For children with ADHD, checklists and visible timers can support memory and help them start tasks.[12] For autistic children, visual supports can help with following routines, building independence, and moving between activities.[5][11] Choose photographs, objects, icons, or written words based on what your child understands, not diagnosis alone.[13][14]
Safety and individual needs
The schedule is a support, not a compliance test. Shorten or revise it when your child is worn out, and leave room for choices and rest.
Make sure your child can access and understand the materials. Avoid warning sounds that frighten or overstimulate them, and keep visual materials out of places where they could create a tripping, choking, or climbing hazard. Adults remain responsible for medication and other hazards; a checklist does not transfer that responsibility.[6] If the routine breaks down, shift from prompting to co-regulation.
2. Offer Co-Regulation During Distress
Challenge and timing
Crying, covering ears, or struggling to respond can signal overwhelm. Co-regulation means staying calm to help your child recover. In that moment, lower demands and reduce anything that feels threatening. The goal is safety and recovery – not compliance.[17] Once distress starts, shift from teaching to calming.
Parent actions
Follow the same sequence each time. Lower your voice, slow your movements, and relax your posture. Name the feeling, acknowledge it, and state the safety limit. Then offer two choices: comfort or space.
Pause after you speak. Skip lectures, repeated instructions, questions about why it happened, and attempts to solve the problem right away.[4][17]
ADHD and autism considerations
For children with ADHD, impulsivity may mean you need more physical distance, an immediate safety boundary, and one short prompt instead of several instructions.[15][16]
For autistic children, reduce noise, light, and communication demands. Give them time to respond, and accept pointing, picture cards, or an AAC device. Do not force eye contact, speech, or touch. Allow safe self-soothing behaviors.[3][4]
Safety and individual needs
Plan for requests for space while your child is calm. Agree on a safe location, a break signal, and when you’ll check in. Keep your distance unless your child needs direct support.
If aggression or self-injury occurs, move siblings or other children away, remove hazards when it’s safe to do so, and follow your child’s co-regulation and safety plan. If you cannot keep everyone safe, seek emergency help.[17]
3. Set Up a Calm Space and Regulation Kit
Challenge and timing
Set up the space during a calm period. Use recent overload patterns to pick a spot your child can reach easily. Choose a quiet corner, clear clutter, reduce background noise, and provide dim, adjustable lighting.[2][19] This space is for recovery, not punishment. Offer it at the first signs of overload rather than waiting for distress to peak.
Parent actions
Build a calm kit together. Choose and test a few tools that help your child settle, communicate, or get some space.
Options include noise-reducing headphones, a comfort item, and communication cards.[18][21][23]
Keep a small selection in an easy-to-reach bin, rotating items as needed. Practice using communication cards during calm moments.[18][23] Choose tools based on how your child responds, not their diagnosis.
ADHD and autism considerations
For ADHD-related restlessness, allow stretching or other safe movement instead of requiring your child to sit. For autistic sensory preferences, test one tool at a time and remove anything that makes distress worse. Keep only what helps your child.[19][20][21]
Safety and individual needs
Keep the space optional. If your child avoids it, offer another location or activity – never use it as punishment. Leave the exit clear, check tools for small-part and cord hazards, and get guidance tailored to your child before using weighted or compression tools.[22][24] Once the space is ready, pair it with clear signals for when to use it.
4. Teach Emotion Words and Body Cues
Challenge and timing
Once your child has settled, spend 2–5 minutes practicing how to spot early signs of distress. Choose a time when they’re calm or only mildly upset. Start with familiar words: happy, worried, frustrated, angry, and tired.
Use drawings or emotion cards to link feelings with body sensations. Body cues often show up before your child can name a feeling. Noticing them gives you time to offer support before overload peaks.
Parent actions
Look for changes from your child’s usual behavior, such as fast speech, a clenched jaw or fists, pacing, withdrawal, or irritability. Create a five-point scale using numbers, colors, or pictures. Give each level one action:
1, calm – continue; 2, uneasy – check the schedule; 3, frustrated – breathe or ask for help; 4, very upset – use the calm space with an adult; 5, overwhelmed – stop demands and focus on safety.
Use the scale to choose support before overload builds. Treat body cues as clues, not proof of a specific emotion.
ADHD and autism considerations
For children with ADHD, keep the scale visible near their homework area. Offer a brief reminder to check how their body feels before difficult routines.
For autistic children and any child who uses nonverbal communication, accept pointing, drawing, typing, gestures, or AAC. Give them time to process. They don’t need to explain aloud or make eye contact.
Safety and individual needs
The scale shows support needs, not good or bad behavior. Stop practicing if your child gets more frustrated. During a meltdown, skip emotion labels, explanations, and ratings. Check for physical or sensory needs before assuming your child needs more practice.
5. Plan Movement and Sensory Breaks
Challenge and timing
At the first signs of distress, match the break to your child’s body cues. Movement may help with focus, while less noise, light, and fewer demands may help with sensory overload. Plan a 3–5-minute break before predictable high-demand periods to help prevent escalation and make the next task easier to handle. If overload is already high, reduce sensory input rather than adding movement. Breaks are support, not rewards to earn or privileges to lose.[2][25]
Parent actions
Offer two or three choices, then test one at a time:
Try a short walk, stretching, jumping, wall pushes, or pushing a laundry basket.
Track the break’s length, what your child does afterward, and whether the next task feels easier. Keep what helps and drop what adds stress.[2][25]
ADHD and autism considerations
For ADHD, plan predictable movement breaks and use a visual timer to show when they end. For autism, check whether reducing sensory input helps more than movement. Follow your child’s response, not the diagnosis, and allow extra recovery time when needed.[2][25]
Safety and individual needs
Match movement to your child’s mobility, balance, and medical needs. Don’t force participation. Supervise jumping and carrying, keep loads within your child’s ability, and keep paths clear. Stop if your child has pain, dizziness, breathing trouble, or distress. Get professional guidance before using weighted equipment, intense spinning, or deep pressure.[25][26] After each break, use the same cue to help your child return to the task.
6. Ease Transitions and Prevent Overload
Challenge and timing
Use patterns in your ABC log to identify transitions where your child needs more support.[31] Watch what happens before distress:
Stopping screens, leaving a preferred activity, or shifting between caregivers.
Record the time, setting, demand, and communication used. Also note hunger, fatigue, illness, or a busy day. Once you identify the trigger, adjust the transition before distress starts.[33]
Parent actions
Give a brief warning, show what’s changing, name the next activity, and make the endpoint clear. Offer two acceptable choices instead of an open-ended question. Have materials ready and break the task down to one starting step. Wait 10–15 seconds – or longer if needed – for a response before repeating directions.[32][35]
Use immediate, predictable reinforcement for that first step, then gradually lengthen the task.[28][34] If the same transition keeps failing, change the demand before adding more prompts.
ADHD and autism considerations
For ADHD, shorter directions, visible time limits, prompt feedback, and movement may help your child get started. For autism, concrete visual information and advance notice may reduce uncertainty. Adjust noise, light, and other sensory input, and plan recovery time before the next demand.[27][29][30]
Safety and individual needs
If your child is tired, hungry, ill, or overstimulated, shorten or delay tasks that can wait and meet basic needs first. Basic care and needed breaks should never have to be earned. If transitions involve running, injury, or severe distress, ask a clinician or school team for a custom safety plan. Match the transition plan to your child’s energy, communication, and sensory needs.
7. Encourage Break Requests and Other Replacement Skills
Challenge and timing
After reducing triggers and co-regulating, teach your child to ask for support before distress escalates. Practice one or two simple replacement skills while your child is calm:
Ask for a break, ask for help, or use a help card.
Functional Communication Training (FCT) teaches a safer way to express the same need. Start with the easiest signal your child can use reliably.
Parent actions
Give the requested break or help right away. Briefly acknowledge your child’s signal, moving away safely, or accepting help.
Practice waiting while your child is calm. Start with no delay or a very short pause, and shorten the wait if distress appears. After recovery, support a return only when your child is regulated. Once calm returns, practice the same response again.
ADHD and autism considerations
For ADHD, keep the card within reach and reinforce even tiny steps right away. For autistic children, keep non-speech signals available. Match your feedback to your child’s preferences; a quiet acknowledgment may work better than enthusiastic praise.
Safety and individual needs
Use the same signal, response, and return cue across caregivers. Make sure your child can still use the signal under stress. Help must remain available, even when your child can’t use the practiced signal. Don’t ignore distress: respond immediately to overload, panic, self-injury, aggression, or running.
8. Review and Practice After Recovery
Challenge and timing
After recovery, review the episode to learn what helped and what needs to change. Wait for readiness, not a deadline. Your child should be able to communicate and no longer show intense distress, shutdown, or sensory overload. This may take minutes, hours, or longer.
Look for relaxed breathing, a quieter voice, a return to a familiar activity, or consistent answers to simple questions. Begin with a short check-in, and let your child talk, draw, or point. If they aren’t ready, respect that and try later.[36][4]
Parent actions
Talk through what happened: which trigger came first, what your child felt in their body, and which support helped. Agree on a signal they can use next time and what adults will do differently. Focus on solving the problem, not assigning blame.
Share the trigger, early signs, and helpful supports with teachers, the school counselor, and other caregivers. Use factual language without blame.[36][37] Adults should also help repair the relationship by apologizing and reassuring the child.[40]
ADHD and autism considerations
For children with ADHD, focus on one incident and one or two next steps. Use a checklist or timer, and keep practice under five minutes. For autistic children, ask for less spoken communication, use their preferred communication supports, and allow extra processing time.[36][4][38]
Safety and individual needs
Check for injuries first. Then decide whether your child needs privacy, quiet supervision, or both. They may need quiet, food, water, rest, sensory support, or a trusted adult nearby without conversation.
Don’t force a debrief or an apology. If distress returns, stop the review, return to regulation support, and revisit the plan later.[4][1][39] Use what you learn to shape the next response around your child’s needs.
Match the Response to the Child’s Needs
Use your notes to connect likely triggers with the support your child needs. The same behavior can point to different needs, so respond to the barrier – not the diagnosis alone. Start by checking safety, pain, hunger, fatigue, sensory input, communication needs, and recent changes.
When distress shows up, let the pattern guide your response.
| Presentation | Possible contributing factor | Response | Prevention | Avoid |
|---|---|---|---|---|
| Impulsive escalation | Trouble with impulse control, frustration, or too many demands | State a brief, calm safety boundary and offer one concrete, safe choice. | Keep routines predictable and give immediate feedback for safer behavior. | Long lectures, yelling, or several instructions at once |
| Sensory overload | Too much sensory input | Reduce sensory input. | Put sensory supports in place before overload builds. | Unwanted touch, forced eye contact, or stopping self-soothing movements |
| Transition distress | Uncertainty about what comes next | Show the next step visually, then give time to process it. | Give advance notice of transitions and changes. | Rushing, threats, or unexplained changes |
| Communication frustration | Less access to speech under stress | Offer gestures, pictures, writing, or AAC, then pause. | Keep communication tools available so the child can ask for help or a break. | Demanding speech or taking away communication tools |
| Post-school shutdown or recovery needs | Exhaustion after a full day of sensory, social, or attention demands | Allow low-demand recovery time after school. | Build in an after-school buffer. | Immediate homework, chores, or pressure to explain feelings |
Share the trigger, the response that fits the moment, and the support plan with teachers and caregivers.
Coordinate Support at Home and School
Use the trigger patterns you’ve identified at home to plan support at school. With caregivers, teachers, and providers, create a brief support profile covering the child’s preferred feeling words, visuals, communication method, sensory supports, and transition warnings. Carry over visual routines, co-regulation, break requests, and recovery time. Specify who provides each support and when. Share nonclinical details through school-approved channels, and get consent before sharing clinical information. Consistency means reliable access to support – not identical demands in every setting.
Choose one trusted adult for school check-ins, and share the plan with other staff. A two-minute morning check-in can cover schedule changes, likely stressors, and available supports. Keep the written break plan brief and nonpunitive. Explain how the child requests a break, where they go, who supervises, and how they return to class. Include what happens when they need more recovery time.
Once the school routine is clear, agree on how adults will respond. Reward one or two observable skills at both home and school:
Asking for help or checking a visual schedule.
Give specific feedback when the child uses those skills, rather than rewarding only calm behavior. Communication tools and needed sensory supports must never be something the child has to earn. A brief daily report card can link school feedback with encouragement at home.
Ask school staff to record the activity, early signs of distress, support used, recovery time, and return to learning. Keep these notes short. Review them together every few weeks, after major changes, or when distress repeats. Include the child’s view: Was help available, and did it help? Adjust accommodations based on access, missed learning, and recovery – not just whether the classroom was quiet.
If the plan still doesn’t protect access to learning, move from informal help to formal school supports. Request a school evaluation in writing if challenges affect learning, attendance, safety, or participation. Eligible students may receive an IEP or Section 504 plan. Document staff duties, check-ins, break steps, and progress monitoring so support doesn’t depend on one familiar teacher.[41][42]
When to Seek Professional Support
Seek an assessment when episodes happen often, get worse, or disrupt sleep, school, or family life. You don’t have to wait for a crisis. If the patterns continue despite support, bring your log to a clinician.[43][44]
Start with your child’s pediatrician or a qualified child mental health professional to understand what’s behind the dysregulation. Ask about medical, developmental, medication, sleep, communication, and sensory factors – not just ADHD or autism.[43][47]
Choose support based on your child’s and family’s needs. Parent coaching can help caregivers build practical routines and respond consistently. Family therapy can help with conflict and sibling strain, while individual therapy can address concerns affecting the child or caregiver. Coaching should work alongside – not replace – an evaluation when safety is a concern or difficulties seriously affect daily life.
Growth and Change Counseling offers parent coaching, family therapy, individual therapy, and support for neurodiverse relationships in Campbell, San Jose, Los Angeles, and Roseville, plus telehealth across California. Ask about the provider’s experience with your child’s age, communication needs, and regulation challenges. Also confirm whether your child needs a separate pediatric assessment.
Call 911 or seek emergency medical help for immediate danger, serious injury, a weapon, or an active suicide or self-harm attempt. For a behavioral health crisis without immediate physical danger, call or text 988 for 24/7 support.[43][45][46]
Conclusion: Prevent Overload, Support Recovery, and Teach Skills
These strategies work best together: prevent overload, support recovery, and teach one skill when your child is calm. Shape the plan around your child’s communication style, sensory needs, and preferences. Keep cues consistent at home and school.
Progress means asking for help earlier, responding more safely, and recovering faster – not staying perfectly calm. Watch for these changes over time rather than judging progress by one difficult day.
FAQs
How can I set limits without escalating my child’s distress?
Validate your child’s feelings while keeping limits clear. Speak calmly and keep it brief:
“I see you’re frustrated, but hitting is not okay.”
Focus on what needs attention now. Offer a few simple choices and use when-then instructions to explain what comes next.
Take steps to manage your own stress, and plan routines together when your child is calm. If tension builds, pause. Notice and reinforce positive behavior. For more support, Growth and Change Counseling offers parent coaching and family therapy.
What if my child rejects every calming strategy?
When your child rejects calming strategies, it likely points to an overwhelmed nervous system – not defiance. Pushing those tools during distress can add to the tension.
Stop any method that increases discomfort. Ease demands, stay calm and present, and acknowledge what your child is experiencing. Tailor calming tools around items they already find soothing, and practice when they’re calm – not during a meltdown.
Growth and Change Counseling offers parent coaching and family therapy to help families work through these challenges.
How can I stay regulated during my child’s meltdown?
Manage your own emotions first. Watch for early signs of stress, such as a tight jaw or a rising voice, and pause. Take three slow belly breaths – in for three counts, out for five – or hold something cold. Remind yourself that the behavior isn’t personal.
Once you feel steady, keep support simple. Lower your voice and stay close without demanding eye contact or an apology. If you feel overwhelmed, step away briefly to reset.
Related Blog Posts
- Parenting with ADHD: Sensory Overload Solutions
- ADHD Parenting: Emotional Regulation Strategies
- Parenting ADHD Kids: Co-Regulation Tips
- Stress Management for Neurodiverse Families
